Thursday, 21 January 2016

Maybelline - The Nude Palettes


Nude palettes have become a staple piece in my make up bag. easy to wear and with so many options to blend colours, they are a must have!

As you may be aware by now, I'm not a huge fan of premium make up brands - I'm always on the hunt for a good dupe of a more expensive product and honestly don't feel that there is much difference in quality when it comes to comparing two similar beauty products from the premium side of the scale versus high street versions.

My first nude pallet I have is my Urban Decay one (the only premium brand I like aside Two Faced) Naked palette, which I reviewed last year, however, found it wasn't good when it came to transporting it around as I'm not an early bird, I tend to do my face on the train to work to catch up on extra zzzzs.

Urban Decay have answered this issue by also making more compact travel versions with a handful of the shades shades in but it is still crazy expensive at £23 for 6 shades, so I went on the hunt for a compact nude palette that doesn't compromise on the amount of shades, a good mix of shades ranging from whites, golds to dark browns and at a good price.

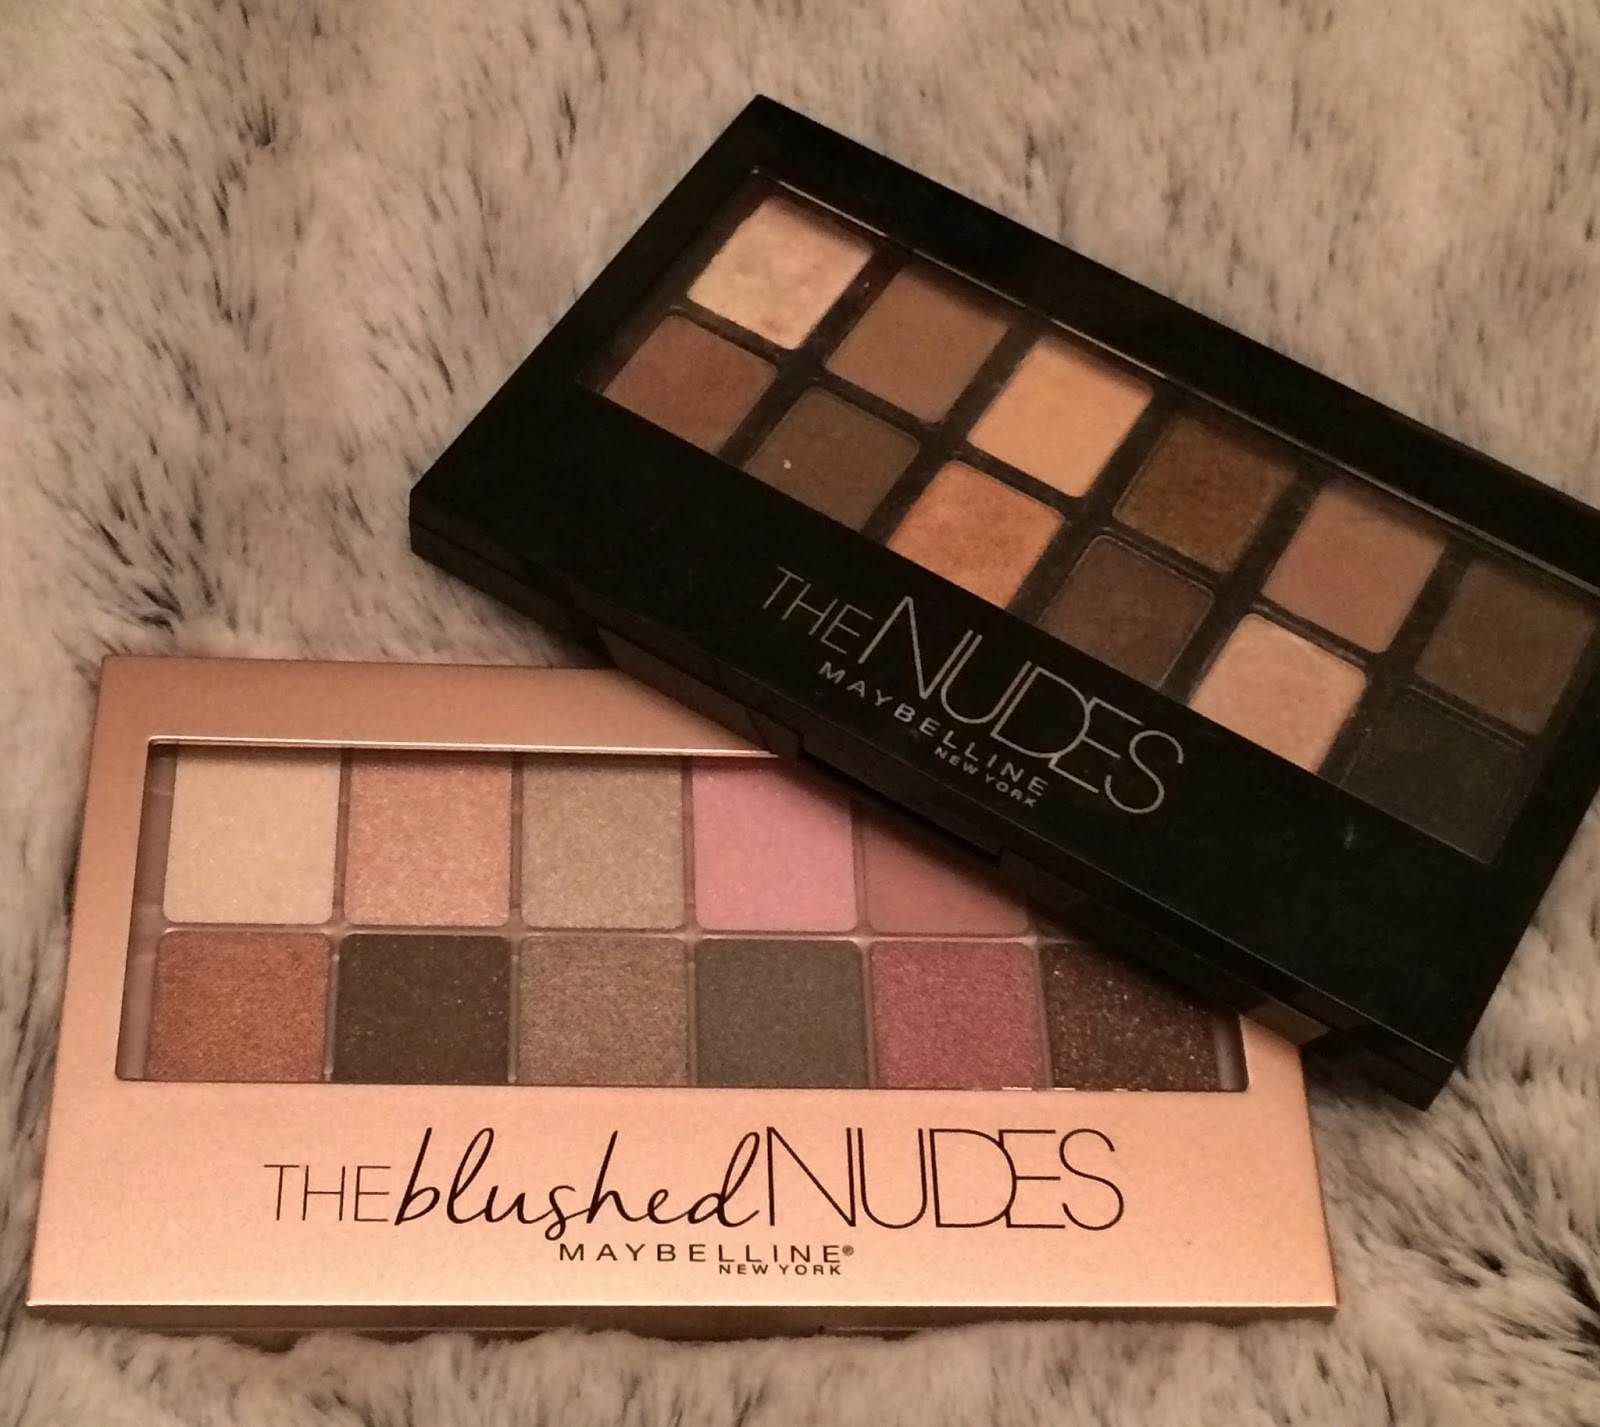
Thankfully Maybelline answered my wishes by bringing out the Nude palette (the one in black) a few months ago which I absolutely adore! - at less than half the price of Urban Decay with many similar shades and make up bag friendly - result!


Just after Christmas, they also released Blushed Nudes - perfect shades for the Spring with colours ranging from white, warmer pink tones and silver.  


Although they look quite shimmery they are very subtle and can be worn during the day. 


Each palette comes with a application brush, the only way it would be made totally perfect is if it came with a mirror but this would prob bump the price up much higher. 


The nudes pallet is full of your fave typical nude colours again starting from white and sandy colours to golds and dark browns for brushing in to the eyelid crease. Sorry you can tell this was taken after I started using this one, its not a clean looking as my relatively new Blush palette ha! 


On both palettes its so easy to mix colours - I don't think I've discovered any shade that doesn't compliment another! They are perfect for wearing on their own or to mix and match, I tend to choose a lighter shade for the corner of my eye (tear ducts area) and then for the other half of my eyelid, blend in a darker shade. 


Find the Nude Palettes in Boots now - they are currently on specal offer so can get them for £7.99 instead of £10! :) 


SHARE:

Friday, 10 July 2015

WAH London - The Ombre LA Summer Nails Edit


When I saw this WAH London Nail kit in the Boots Christmas catalogue last year I soo wanted to try it out.as everything is there for you in one box to make the design. I'd heard really good things about WAH London (who are based in Topshop Oxford street) and was really excited that they had now launched a concessions in Boots so I don't have to travel so far to get some funky nails.

It was abit too much of a summery design though for the festive season and as it retailed for £23 back then it was way over my Christmas stocking budget. Luckily they have still stuck around in Boots since and have also gone down to half price - yay! So I picked up this Dreamy Day nails kit and thought I'd give it a go!

Its actually really easy to do, though I got abit too impatient and didn't do the sponge bit as per the instructions I still got a pretty effective ombre effect.

This kit is the best one I have seen for the summer and has the coolest designs for your holidays or for festivals. Its def got a Californian LA vibe to the colours in this one! <3

Contents include:

x2 Nail Varnishes (one Pink - Slicker than your average, one Peach - LA days)
x3 Sponge Applicators
x2 Sheets of Nail Stickers (Gold Palm Trees & Peace Signs)
x1 Yellow Nail Art Pen


                        How to do Summer LA peace ombre nails

Add the base colour to your nails all over - leave to dry

Once dry, paint the bright pink nail varnish on to the sharp tip edge of the sponge and then working from the tip of  your nail, dab lightly to halfway down to create a fade

Load up your sponge again with more polish only this time down to a quarter of the way down the nail, repeat again only then only dabbing along the very tip of the nail to build up a solid colour at the end 

Once dry, peel off a peace sticker and apply to the middle of your nail

Finally, add a coat of clear nail varnish top coat to keep the sticker in place & voilà! LA summer ombre nails! 


The kit does come with two versions of nail stickers so I think I will also try to do a reverse version of this ombre design & use the darker pink varnish and use the yellow nail pen to create yellow tips..keep an eye on my instagram - I'll post a photo of the results there!

WAH London are due to release the next in line to these box sets which is called Immerge. Immerge is a high jelly polish which helps you create psychedelic patterns on your nails. ooooh! These are due out in the next couple of weeks and will be on sale in Boots stores. Add your name here on the the WAH London mailing list to hear about when it comes in and get 10% off your order!

Have you seen any summer nail designs out there? :)

Love, Sarah  x
SHARE:

Thursday, 25 June 2015

Bare Minerals Foundation


Bare Minerals SPF15 Minerals Powder Foundation in Fairly Light // available online, at Boots or selected Debenhams stores 

I'm no stranger to Bare Minerals foundations and have been a total convert since I bought the starter kit about 9 years ago from Debenhams.

I'm sure many of you can relate to trying at least 20 odd foundations before finding the perfect one for your skin, its really tricky. I had tried a variety of brands from MAC (too cakey) to Maxfactor (could never find the right shade) before stumbling across Bare Minerals one day after seeing this interesting mineral powder advertised during an MTV ad break and thought I would give it a try! 

if you havent guessed already i dropped this on the floor whilst taking pictures, its not usually like this looool!! 
My main issues for my skin is firstly it is very sensitive and i go red V. easily and I also have combination skin so on my face my skin can go from oily to dry in a matter of  days or depending if its that time of the month...joy! 

I had found my perfect liquid foundation in Bourjois Healthy Mix  - I cannot rate this any higher if you have sensitive or combination skin, it is just amazing - I use this on my cheeks and under my eyes for an even coverage but to get all my skin one even tone and to seal the foundation I also needed to use a powder that wasnt drying and kind to skin. Which is Bare Minerals comes in. 

The Bare Minerals foundation is just weightless, totally uncakey and gives a really natural look which for me is what I prefer. Many other powders I also find are just in shades porcelain, olive skin and black so nothing inbetween! Bare minerals has a really wide range of shades including inbetween shades so you can get the perfect shade to match your skin tone without choosing one too light or too dark. 

Unlike other powders, it  goes on really easily and smoothly and buffs on beautifully! I use the Bare minerals Kabuki brush and it works a treat. 


Another great perk is that it lasts for ages.. I only need to buy two pots a year and i use it everyday apart from Sundays when I go make-up free. You don't need to use alot to get great coverage, you just need to buff it in to your face and it makes a huge difference in moments. 

Unlike my terrible picture above (I dropped it on my bathroom floor whilst shooting loool! beauty blogger fail!) there is actually a 4 little holes where you can sprinkle the power from which you can just about make out from that pic in to the lid and the dip your brush in there.

This cool little contraption can lock so when you are carrying it about in your makeup bag the powder doesn't go everywhere and make a mess. its only a mess cus i dropped  it whilst open on a really hard floor :( On the bright side though you can see how really fine and smooth the powder is. 


They come in matte colours so non cakey and great for getting rid of shine. so perfect for the summer months ahead! 

It is also recommended that you use Bare minerals as a powder on its own rather than on top of liquid foundation, if your blessed enough to be fairly blemish free and not prone to going scarlet randomly (people do literally think i have sunburn without any make up on lol) then I'd def recommend you try this out! 

This is my skin with just Bare Minerals on  all over below! so you can see what i nice coverage it gives just on its own :) 

However due to the nature of my skin I feel a little bit braver using both liquid and powder, particularly during the summer months, I''m one of these who only has to do a light jog to catch the train to work on time in the morning and look like I've run the London marathon with how sweaty i get just doing that!   


Minimal Make up: 

I'm wearing: 


Bare minerals is definitely a beauty product I'll keep going back too, Mascaras, eyeliners and some lipsticks I always chop and change but eye shadows, brow pencils and foundations I have as my make up bag favourites that i buy over and over again! 

If your interested in Bare minerals I would def recommend trying the starter kit and visiting your nearest Bare Minerals shop/counter to talk to a consultant. 

What do you think of Bare Minerals products? have you tried them? :) 

Love, Sarah x 


SHARE:

Sunday, 19 October 2014

Sleek i-Divine Arabian Nights Smoke & Shadows Palette


Shades from left to right:

  1. Scheherazade's Tale
  2. Gold Souk
  3. Aladdin's Lamp
  4. Sultan's Garden
  5. Hocus Pocus
  6. Simbad's Sea's
  7. Genie
  8. Black Magic
  9. Stallion
  10. Sorcerer
  11. Valley of Diamonds
  12. 1001 Nights

Instead of an OOTD, I decided to show you my latest edition to my makeup shelf, this amazing arabian fantasy inspired pallette from Sleek.

Dramatic eyeshadows and smokey eyes have always been abit of a difficult one for me, having really light blue eyes makes any form of dark colours abit of a no go area as they always seem to make me look like I've got a black eye no matter how much I blend or how well recommend the eye shadow is. Since being drawn firstly to the pretty packaging though of this set and then opening it up to see a collection of both smokey and warm rich colours which are my favourite to wear made me instantly want to try out this pallette!

All the colours blend so well and it's easy to go for a subtle look with shades 1,2,3,4 & 7 and then using the other shades for going out times. Its really easy to create a smokey eye using these gorgeous shimmering jewel shades too minus the black eye issue as they smudge together to create a more natural looking smokey eye rather then taking a black marker pen to your face as some smokey eye product have been like when I've tried them, with these you can build up the dramaticness of the colours as much as you like. The deep tones of green, blue and gold melt together creating really effective party look they are really shimmery as well, my pics don't really do them much justice!

These pallets are only £7.99 from Boots and are perfect for all skin tones. Another amazing product from Sleek! Will have to try out the Vintage Romance pallette next I think which has loads of pretty purples and pinks for a girlier vibe :) Just love this pallette!

Love, Sarah x


SHARE:
© Sarah in Wonderlust. All rights reserved.
Blogger templates by pipdig